How to start using Paysera POS?


Step 1: Contact us or fill in a form
We want to meet all your expectations, so the first step is to discuss your business needs and what we can offer you. You can contact us in the way that's most convenient for you: write us an email, call us, or fill in a short form and we'll contact you ourselves.
If you've already firmly decided that you want to start using Paysera POS or try the demo version, you don't need to fill in the form. Contact our client support team in the way that's most convenient for you.
Once you confirm that you need this service and choose a plan, our employee will note down the necessary information about your company:
- Your name and surname;
- Company name;
- Company code (or personal identification code if you're a freelancer);
- Your points of sale and their addresses;
- VAT payer’s code;
- Contact email address and phone number.
Step 2: Ordering a Verifone card terminal
To start using Paysera POS, you'll need one additional device – a Verifone card terminal.
Upon receiving your confirmation and all the necessary information, we'll save your time and contact Verifone on your behalf to order the card terminal.
Verifone will contact you directly within no more than 2 working days – together you will be able to discuss your needs, the card terminal specifications that best suit your business, and sign a contract that meets all the conditions you agreed on.
Upon signing the contract, Verifone will send you the card terminal, which should reach you within 2–3 working days.
Step 3: Creating a Paysera POS account
While you’re waiting for the Verifone card terminal, make the final actions – contact us about creating a Paysera POS account and assign Paysera as your cash register administrator in the VMI i.EKA subsystem.
You don't need to worry about creating a Paysera POS account, as we'll do it for you. We'll also send you all the necessary data and a practical guide that will familiarise you in more detail with the Paysera POS system.
The next step will be to assign Paysera in your VMI i.EKA subsystem. Follow these steps::
- Log in to your VMI account;
- Select the taxpayer you represent.
- In the i.EKA section, select Authorised service companies > + Add authorisation.
- Enter Paysera LT, UAB in the search field.
- Select the authorisation date – it's very important not to forget it, so we recommend noting it down somewhere you can check at any time.
- Check the boxes that you're assigning Receipt data viewing and Receipt data modification rights.
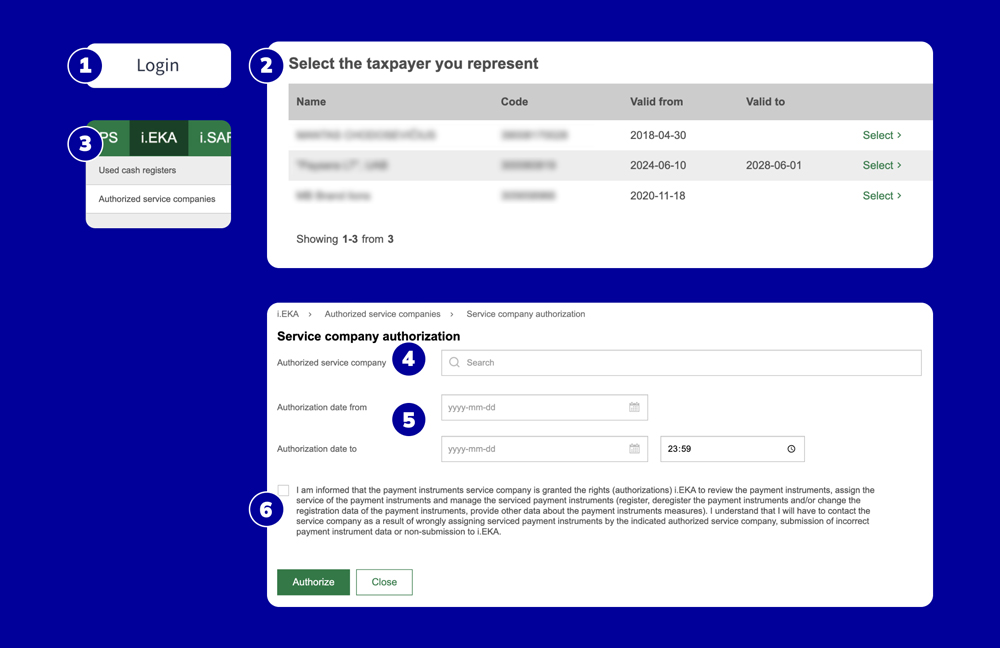
Upon adding Paysera to your VMI i.EKA subsystem, inform our employee with whom you've been communicating and we'll complete this process.
Step 4: Linking the Verifone card terminal with Paysera POS
The final part of this process is to link your Verifone card terminal with Paysera POS. You'll only need to contact us and provide your API key and User ID.
Follow these instructions:
- Log in to your Verifone account > go to API keys;
- Click the blue button Create API key;
- Copy the key and save it;
- Click on the generated key and copy the User ID > save it.
That's it! You can now log in to Paysera POS, try out the features, and do the preparatory work
Paysera POS features
Let's now move on to the practical aspects. As you already know, Paysera POS has many convenient features, such as applying discounts, product returns, monitoring sales and stock levels, issuing invoices, and more.
Let's discuss how you can use each feature.
How to prepare product storage through Paysera POS?
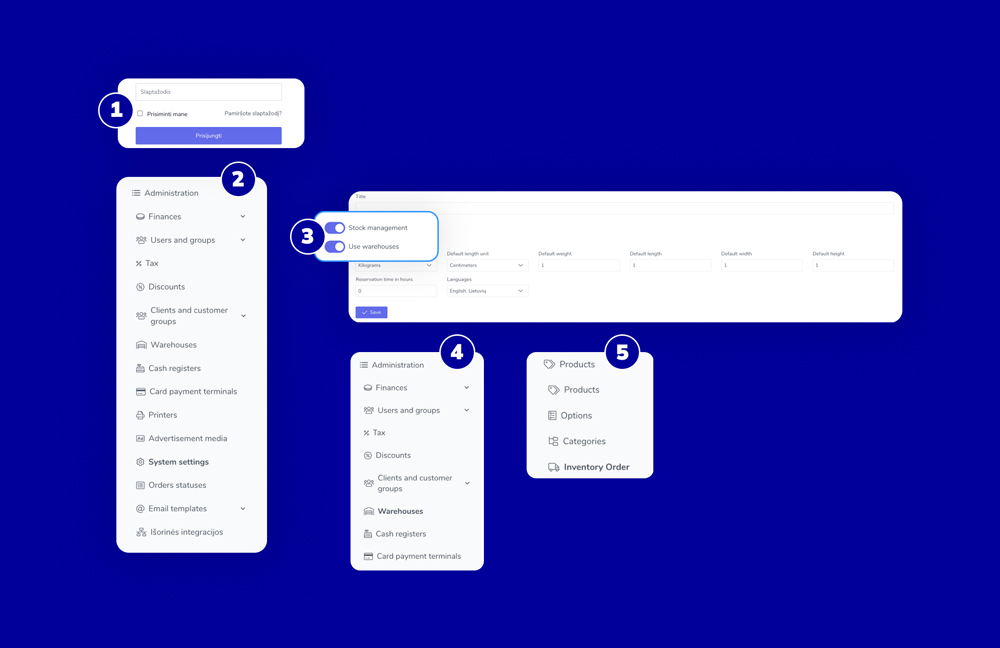
- Log in to your Paysera POS account.
- In the menu on the left side, select Administration > System settings
- Select Stock management (Enable) > Use warehouse (Enable).
- If you need more storage locations, select Storages from the menu and add names and addresses as needed.
- In the menu, select Products > Inventory Order and select the storage to which you want to add specific products.
If you have several physical points of sale, you can create a separate storage for each and choose a default one.
How to create a product or service through Paysera POS?
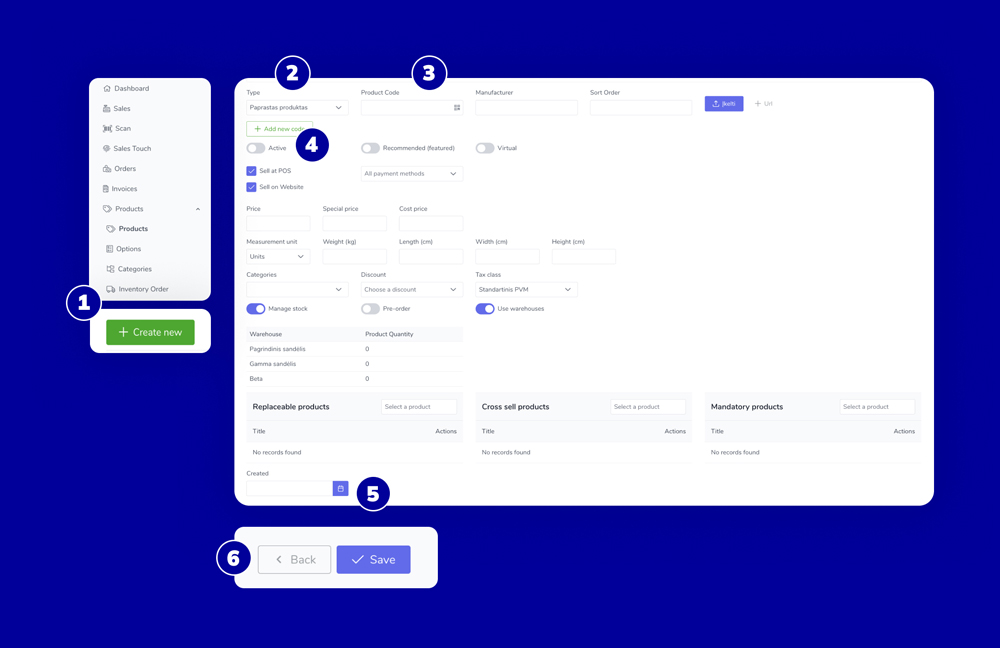
- In the menu list, select Products > and again Products > Create new.
- Enter the required information, select the product type.
- If you need a QR code for the product, click on Product code and generate it.
- If you want to start selling the product immediately, select Active.
- Enter the remaining information and enter the product creation date at the very bottom (in the field Created) – this will help you track the products entered most recently.
- Click Save.
How to create a product category through Paysera POS?
- In the menu list, select Products > Categories.
- Click Create new and fill in the category information.
- Then choose the products to which you want to assign the newly created category.
How to apply a discount through Paysera POS?
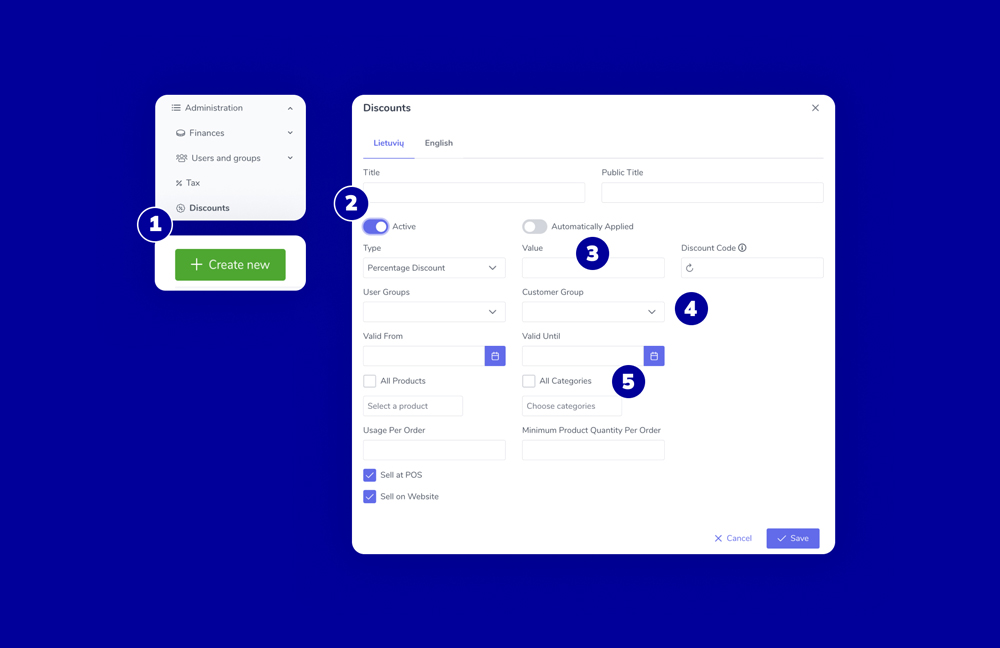
- In the menu list, select Administration > Discounts > Create new.
- Enter the discount name visible to the buyer > select Active if you want the discount to be visible immediately.
- Define the type of discount (discount in Euros, percentage discount, or final price) and fill in the field Value, which will reflect the amount of the discount.
- If necessary, select the groups of users and customers to which the discount will apply.
- If necessary, choose to apply the discount to all products and all categories or select specific products and categories.
- Set other settings you need.
If you want to apply a discount in the cart, follow these steps:
- Click Cash register > Add a specific product/service to the cart.
- In the cart, next to the selected product/service, click on the discount field.
- Enter the discount amount or percentage you want to apply.
- Confirm the discount.
If you want to apply a discount to a specific product, follow these steps:
- Click Cash register, then select a specific product.
- Enter the price and the price with a discount.
- Click Save.
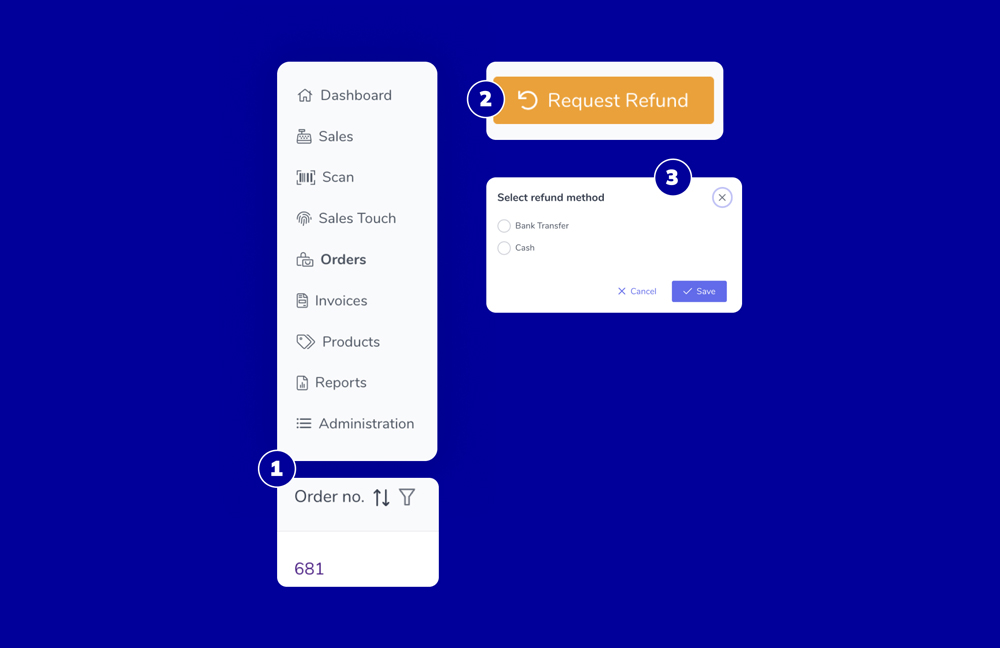
How to make refunds through Paysera POS?
- In the menu list, select Orders and click on the specific order.
- Click the yellow button Request refund at the bottom of the page.
- Confirm the refund on the order refund (you will be automatically directed to this order) and choose the method you want to use to refund the money.
- If you want to refund through the cash register, choose how you want to refund the money – in cash or to a card. Then confirm the refund and the system will print a refund receipt.
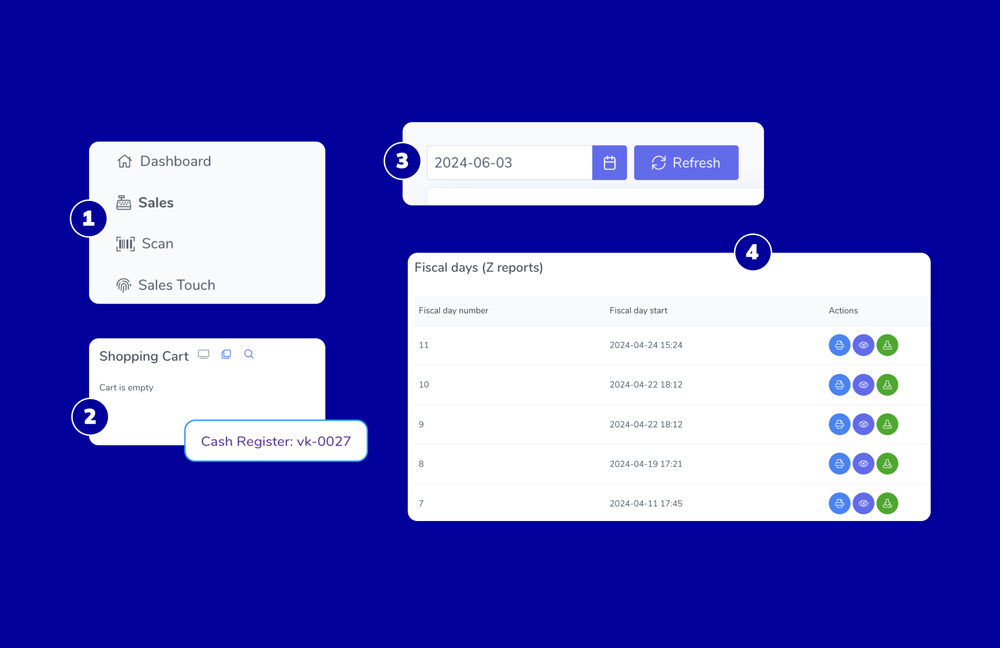
How to check fiscal operations through Paysera POS?
- In the menu on the left side, select Sales and click Cash register under the shopping cart.
- Here you can deposit or withdraw cash to the cash register or close the fiscal day (generation of the Z report).
- Select the relevant period for which you want to check the sales receipts or card transaction reports.
- You can also view the Z reports for all days at the bottom of the window.
In the report you can also see the total sales amount, total transaction fee amount, cash balance, cash deposit/withdrawal operations, payment amounts by payment methods (cash, card, etc.).
You can view sales reports in the system, download them as a .txt file, or print them.
How to check the product stock level in the storage through Paysera POS?
- Log in to your Paysera POS account.
- Click Products > and again Products > you will see the stock levels at the bottom.
If the list is large, use the search or filtering options to quickly find a specific product or product group.
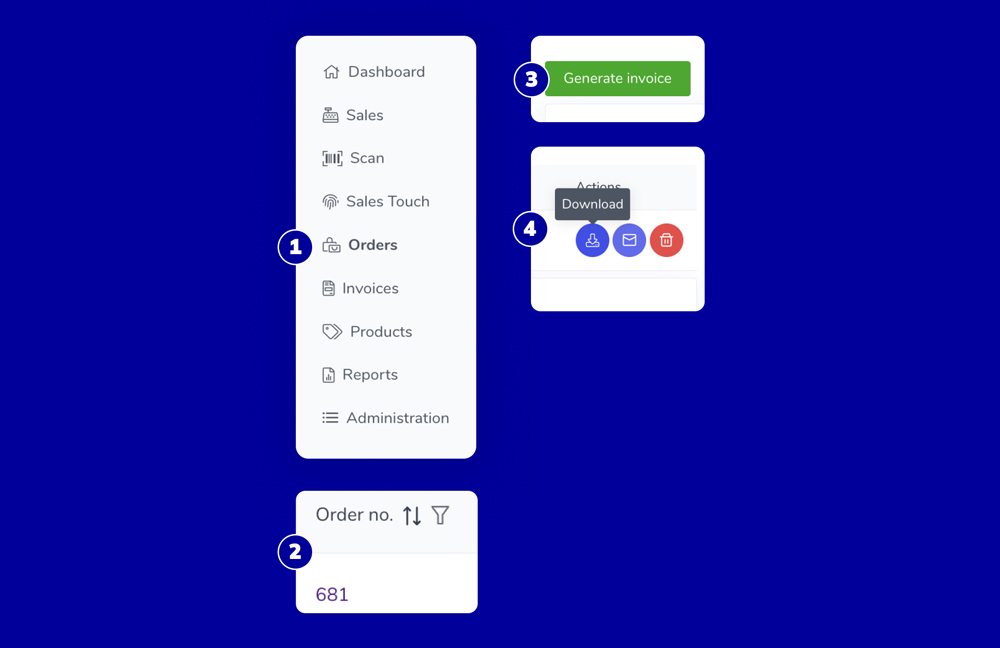
How to issue an invoice through Paysera POS?
- In the menu on the left side, select Orders.
- Upon clicking on the selected order, select Issue a credit invoice.
- Upon issuing, you can review the invoice and, if necessary, print it or send it to the customer by email.
Have any additional questions for us?
Paysera POS is the most recent Paysera service, so we have no doubt that you may have questions. Feel free to contact our client support team and we will help you!